Monday, February 22, 2016

Easy Bulky Hand Spun Ribbed Hat Instructions


I
I spun this yarn on my Majacraft Rose Wheel -Single Ply Bulky.  It was dyed after being spun with Jacquard Acid Dyes following the dye directions. The yarn was lightly felted by washing it in hot soapy water and dunking the skein in cold water several times. I repeated this  until the desired felting was achieved.  I used Merino roving for this project.  The finished yarn came out very soft and seemed just the thing for  hats. 
I knitted these hats on a 7 mm 16 inch circular needle that is between a 10.5 and 11 in US size. I would substitute a 10.5 US if you don't have the 7 mm, unless you are a tight knitter. In that case, I might use a US 11.

I wanted to knit these hats  for ages two and four- average size girls.  The smaller one is perfect sized for an average 2 year old. The larger one came out a bit bigger than I intended. It fits an adult woman  medium size head.  I plan to make a third hat for the 4 year old next.
I started with 4 balls of merino that were about 3 to 4 ounces each.  I will have enough to complete the three hats. 


Instructions  as Follows for Adult and Small Child Size Hats
I did not do a stitch gauge- but the stretch in the rib is pretty forgiving if your off a bit.
Materials needed
1 Ball of Bulky Yarn- about 2 ounces
16 inch circular needle size 7 mm or US equivalent (  10.5 )
One set of double point needles of same size
Size small child- About age 2

 Cast on 40 stitches onto a circular 16 inch needle or use double point needles if you prefer.
Join and work in the round until piece measures 7 inches
K 1, P1 Rib
When the length of your hat measure 7 inches-
Change to K rows for the remainder  of the project,  and work in stockinette stitch- knitting around each row.
At this point, you may want to put your stitches on double pointed needles, as it will be easier to complete the rows as they get shorter.
Decrease 5 stitches every other row by knitting two stitches together evenly around the row starting with a decrease row.
K each row between decrease rows .(20 stitches remain on needles after last decrease
Knit one row.
Final decrease Row:  K 2 together around
Bind off by pulling yarn through your stitches around the row and pulling the yarn taught.  Knot the end into the top of the inside of the hot to secure the yarn so that it does not show. Weave in ends


Adult Female Average Hat Size
52 Stitches
Following same directions as above- work in knitted in the round until hat measures 8 inches.
Begin knitting around for rest of hat
Decrease 8 stitches every other row by knitting two stitches together evenly around the row, starting with a D/C row.
Knit the Rows in between the decreases. ( 20 stitches remain after decrease rows)
Knit one row after last decrease
K 2 together around
Bind off


Wednesday, March 25, 2015

Mini Ice Age Mittens

The last two cold winters here in Maine have inspired me to start knitting mittens.
I am on about my 6th pair now.
I am calling them ice age mittens.  It helps to have a bit of humor when the snow is so high you can't see out your windows and it is so cold,  you can barely start your car.

I have made so many pairs now, that I am not needing a pattern anymore.  I have mostly used handspun and some commercial odds and ends of yarns as well.  I am knitting these on 8 and 10 double point needles and have doubled the strands to make a bulky yarn. Some came out a bit bigger depending on the yarn thickness I used.   The pattern is below.  It is for an adult size average mitten.
I made up the pattern and it is quite simple.  My usual free way of knitting. I like mindless projects, not counting stitches. I also like things that are not perfect and look home knitted. 


The big pair on the left in blue was done in three strands of pretty thick yarn and they will fit a man with larger hands or go over another pair for super warmth. The black and white are handspun of one strand alpaca one on of Blue Face Leicester. I used hand spun white handspun and the hand dyed green for the green and white pair.  The blue pair are all kinds of odds and end as are the red ones.

                                                     Mini Ice Age Mittens Pattern
( This pattern assumes you have some basic knitting skills to knit in the round on circulars. Otherwise, pretty easy)

Bulky Yarn or two strands that equal a bulky yarn.8 and 10 DP needles.
Cast on 24 Stiches on to 8 double point needles so that you end up with the stitches on three needles.  I use a knitted cast on.
Start working in the round.  I personally do one row before I start the circular knitting as it is easier not to twist stitches for me. 
K1, P1 Rib for 2 or 2.5 inches depending on how long you like the cuff.
K 1 row on the number 8 needles.
Change to the number 10 needles and K 3 rows around
Knit one more row and increase 1 stitch as you go around. ( 25 stitches)
Next Row -start thumb increase- Knit 12, place a marker, K in front and back of next stitch, place a second marker,  K12. 
Knit 1 Row.
Increase in first and last stitch of thumb gore in next row and K around.
Repeat these two rows  until you have 10 stitches total between the markers.
Place thumb stitches on a holder.
In the next row,  K around casting on two stitches over the thumb gore. (26 stitches)
K the next several rows until your little finger just reaches to the top of your knitting when trying on the mitten,  or 2 inches from the desired finished length of mitten.
Next row decrease 8 stitches evenly around.  (19 stitches)
K next 2 rows
Next Row  Decrease 9 stitches around ( 10 stitches)
K 1 Row
Next Row- K 1, K2  together around
Bind off the top of the mitten by pulling your yarn through each stitch until all are off the needles
Pick up  thumb stitches from the stitch holder and divide onto three size 8 needles.
K around  knitting in two stitches over thumb gore into fabric in the first row. (12 stitches)
K to 1/2 inch  from end of the thumb desired length.
K 2, K 2 tog  around.
K next Row
Next Row -K1, K 2 tog around.
Bind off in the same manner as the tip of the mitten by pulling the yarn through each stitch.
Finish Mitten by weaving in ends and yarn with darning needle.

I have made variations of this pattern and used less stitches for grandkids etc. It is pretty mindless once you have made a few pairs. The big needles help it go fast.
I use the 8 needles on the thumb as they make the thumb a bit warmer with the fabric more tightly knitted. 


Thursday, February 27, 2014

Convert Your Skein to Yarn balls- No Tangles

I occasionally get questions about how to unravel a large skein of sock yarn the correct way.  If not done correctly, it can result in hopelessly tangled yarn and a miserable start to your project.

Large skeins of hand dyed yarn can be especially challenging at times to unravel.  They can be upwards of 500 yards. Having a  basic understanding of how the skein is put together and the ways to take it apart will save you a lot of frustration.

A skein is created using a skein winding device of some type.  I have one that runs with a motor and winds each wrap of the skein in whatever size I set it for.  It wraps it neatly around and around in loops as it takes the yarn off a cone or ball. When you reach the end of the skein,  you tie the two ends of the skein together.  While it is on the winder, you tie several ties evenly around the skein - usually 4 or more. 
This keeps the yarn in order so it can be unwound which is necessary in order to use it. 

When you are ready to take it off the skeins,  you need to place it so that the circle of loops is over something that will keep that same configuration while it is unwound. Some people loop it over their knees  or over the back of a chair. The ideal thing to use is a swift that holds the skein firmly in place and moves freely as you pull it off around in  a circle. 

When you are looking a really big  skein of yarn with several yards on it, see if you can determine which is the inner beginning thread and which is the end that was at the outer part when it was wound.  Usually, the outer thread will come off a bit easier.  It is helpful to get it on your knee or swift so it is not twisted and that outer thread if on the outside all the way around.  Sometimes it is hard to tell which end to start with so just do the best you can. 

Once it is secured around knees, chair or swift,  cut the ties and begin to roll your ball, looping around each loop as you go. If you are using you knees,  you have to be careful not to let any of the loops come loose and  sneak to the other side of your circle as that will create a tangle.  Sometimes they want to slip off you knee and you might not notice.  Once this happens, it can be hard to tell which side of the loop they belong on.

As you go, resist the temptation to do the over under strands, thinking the skein is tangled somehow. It is not. If you think about the science of how it goes together,  it does not start out tangled or get tangled half way through.   If you start doing the over under stuff, then it is tangled and you will have to keep doing the over under until it gets free which could be the whole length of your skein. 

If you find a spot that looks like the yarn is wrapped around another strand, gently work at it by tugging lightly until it frees itself.  Hand dyed yarn especially can be twisted in a few spots from the dyeing process.  It should pull free and continue on unwinding easily.

Occasionally, the twist just seems like it can't be released.  By the laws of science, it can, but sometimes we give up and decide to do the over under technique to free it. If you do this as a last resort, just know that you are going to have to do it for several rows , possibly to the end and take it slowly.

Never, never remove it from the swift or your knee, or chair and lie it down  any time during the process.  If you do,  you will have a mess. Even near the end of the skein, when it looks safe to take it off, I would not.  You will be surprised how much of a mess you can make. 

This technique of skeining yarn can also be used in reverse, if you have yarn that you don't want to get tangled from the balls and you want to store it. I can't tell you how many times I have looked into a basket or bin of yarn on balls and all the ends are wrapped around all over and tangled with other skeins. Even if I have not been in the basket or messed with it, it seems to happen. I really think yarn balls have dance parties when we are not around.

I hope this is helpful to prevent the frustration that comes with a tangled mess of yarn.

Namaste,

Debbie

Sunday, March 10, 2013

Spinning Cotton form Seed. Why Not go for it.

   Spinning Cotton From Seed

I have never spun cotton. I have so much fiber now stuffed in trunks and pillow cases that I may never get to along with several projects lined up waiting in the cue of my imagination.

Right now, I am trying to hold the line and planning to use what I have.  It is much more fun to be in expansion mode for me, buying just about every fleece  I see that I can get my nose into. Ah, just the thought of the lanolin is so yummy. I have stayed away from a couple of fairs lately,  just because I knew I would not, or could not resist coming home with a fleece of two.
It is like standing in front of an ice cream stand.  Not a good idea unless I planned to eat the ice cream.

I like to buy fleece and go from the raw wool to the finished yarn. Dyeing, carding, and blending, sometimes mixing in other fibers such as mohair, or angora into the roving.
What do you like to spin or knit?  What draws you in? - the colors, the scents, texture, the finished project, or maybe all of it.

True confessions. How is your fiber or yarn closet managing?  Where are you stashing your stash?How many boxes and totes are hidden around the house stuffed to the brim? 

I think perhaps restraint is over rated.  Guilt is such a waste of time. I feel great when I am in the energy of just about to buy that fleece and get it home.  I can't wait to get the locks soaking in my slate sink. Get the dye pots out.
Yet, when the fiber is tumbling out of the closet and I don't even have any idea what is in there any more, it is so stuffed, perhaps it is time for  a bit of restraint or a bit of giving away.  I have given away yarn or fiber many times, much to the delight of the recipients, but then off I go again.

Anyway, back to cotton. For now, I will pass.  Or will I.  To be or not to be. To spin it or to live a boring life of guilt and restraint?  What side of me will win out?
If you want to try spinning it right from the raw seed, this video seems pretty cool.

Happy Fiber Frolicing,

Debbie

Sunday, April 22, 2012


If you want to try to dye self striping sock yarns, check out this cool video.

I am not sure I want to try it as I think I would get all the pieces tangled but it does look
interesting to try.

Happy Dyeing

Thursday, February 17, 2011

Canadian Production Wheel

The other day my friend Mary offered to trade her Canadian Production Spinning Wheel for a Carder that I wanted to sell. An offer I could not refuse.
I have a Lendrum, and a homemade upright wheel that spins bulky with a big flyer. I have to admit that I was a bit bored with spinning of late and my wheels have been just sitting for months.
The new wheel has given me a revived interest in  making yarn again.


I realized as I tried to work on my new toy that I was very challenged by the fast spin ratio. The Canadian Wheel has a supposed spin ratio or 20 to one rotation of the wheel. Frankly, it seems much higher to me. I guess I will have to count and see how close that is. Regardless, the wheel has  given me a whole new interest in the process.

You can really feel connected to earlier generations of women spinning on these wheels for practical and utilitarian reasons. It treadles very easily as long as it is kept well oiled. I love the heavy black iron parts and the metal that is part of this style wheel. 

I have started working on some mohair I had carded and dyed a couple years ago plied with Black Alpaca that also has been sitting in my spinning stash for some time.

Even though the wheel is designed to spin very fine yarn, I am spinning mine just a bit thicker as I like it and it is working out fine.
I am having trouble not over twisting and it will take me some time to get it right.
I am an impatient person and so, am knitting a hat as I spin each ball. The wheel has small bobbins and only one on mine so I am making skeins about 2 ounces each once plied.

Here is a picture of the hat as a work in progress on 8 circular needles.
It is very dark blue combined with black and was hard to photograph.
The hat is popcorn stitch and my usual no pattern designs. To decrease at the top section, I knit 3 together instead of 2 as I went around so I could keep the pattern going.


I will post it when it is done very soon. 

Monday, January 17, 2011

Will I Use Bulky Merino Again? My finished Merino Sweater Project

The Sweater Is done

I finished my bulky handspun sweater project finally.  Although it was pretty easy,  it took me a long time.

Lots has gone on this year in my life including a major move to a new house and the loss of my father.
My projects got scattered, and I was lacking in energy to look for them for a few months after my Dad died in April.

I was also limited to my little dell notebook over the summer and it is so painfully slow, I ended up neglecting my web site too, my Etsy store, and just let it all go.  I moved into my new house the end of October, and am now starting to get my life back.

It feels good to be back!

The Project
The sweater project was to knit a free style no pattern sweater from hand spun yarns I created and dyed. I used mostly Hand Spun Bulky thick and thin merino. It is, or perhaps I should say -was beautiful yarn. On the down side,  the yarn ended up pilling very badly. I have worn the sweater almost daily at home for a month and it already looks like a four year old garment. I had been told previously that  Merino pills, but I have never experienced it with the yarns  I use. The merino in my sock yarn, and the others I dye and use for socks do not seem to have this problem. I  think it is because this yarn was so lightly spun as I constructed it to be bulky and soft.

I still do love the sweater and plan to make it agian in another fiber, Blue Face Leicester perhaps. The colors are gorgeous.  As I knit, I ended running out of the merino and substituted some other hand spun yarns in multiple strands to keep the guage as close as possible as I went along. This was one of those unplanned things that made the sweater turn out even nicer in the end.


The How Of Making This Cardigan Sweater
Using size US 13 needles,  I measured around my hips, did a guage sample, and figured out how many stitches would fit loosely around my body.  After casting on the stitches that would go all the ways around me, I ribbed a few inches with 11 needle.  I then switched to 13 needles and  knitted up to my underarms in all one piece. I used  98 stitches to fit my size.

As I knitted, I kept checking and when the length measured from nine inches below my waist  at the bottom and  my arm pit  at the top, I divided the piece onto three needles.  I put the first 1/3 of the stitches on a circular needle, the second third on a larger 13 circular, and the final third on another. I continued to knit up each of these 3 pieces separately until I reached 2 inches below my shoulder line.  I chose to knit all three at once so I could make sure I would not run out of a particular color and would remember the color changes as I went a long.  I did this by attaching a ball to each piece of the color I was using and then attaching a new color on each at the same place on each section.

At the two inch before the top of the shoulder mark, I started decreasing a few stiches on each of the  two narrower front sections every other row where they would join at the neck.  Because I was using such big needles,  I only had about 8 rows to do this in so I decreased 4 times of 3 stitches each decrease.
On the bigger back piece, I just knitted up these 8 rows. Next I bound off, leaving one piece of knitting.

At this point, I sewed the shoulder seams together on each side. Then,  I knitted on the two arms at the shoulders on  13 circular needles. I measured my stitch's per inch and used that to figure out how many stitches to cast on to the arm.  It came out to about 60 for my sweater. I knitted the sleeves around so there is no seam.  I did both arms at once with two circular needles.  I knitted the arm for 5 inches, and then started decreasing.   As I went along, I gradually decreased the number of stitches by knitting two together in about every third row.  I joined my colors on each sleeve so they would match on both sides.

At the bottom of the sleeves, I switched to 11 needles and ribbed, casting off at about 3 inches of rib.  I measured as I went along on my own arm to make sure the length would be just right for me.

The final step of this sweater was to complete the collar and front bands.  I  knitted on enough stitches to the neck to fit comfortably around my neck. I  rib knitted K1, P1,  around the top of the neck with the 11 needles. 

After I did this, I planned out the front bands.  I used my guage to figure out the number of stitches I would need, and then knitted on the left band and ribbed for the desired width. I casted that side off.  I used the 11 US needles and K1, P1 rib.
I then knew how many stitches would go on the other side where the buttons holes would go. I laid my buttons out on the completed side to see how they would space out.

I decided on 7 buttons and figured out how many stitches I needed between button holes. The stitches did not come out exactly even so I had to plan and extra stitch in between two of them. I planned to use two stitches for each button hole and figured this into my math.   I drew it out first so I would  be clear about what I was doing before I started knitting and how many stitches I would leave between each of the button holes as I worked theses.

To start the second band, I knitted on the required number of stitches I used on the other side.  I knitted two rows of rib  and then started the button holes continuing the rib pattern. I planned to cast off two stitches and then add it back in on the following row. This is a really simple way and there are more finished ways to do button holes.  I wanted this to be a really simple fun knit so I did just simple easy techniques throughout. After I finished the button hole side and casted off.

The Finish
I found some old leather buttons that added a funky touch to the sweater that I really liked. They were all different and some were a bit bigger. It worked. I made sure they fit through the button holes, of course before I sewed them on my sweater.  After attaching the buttons, I  wove in any loose ends in the yarns from the back of the sweater,  and  then came the best part.  I  adored myself in my new garment. 

I love wearing the sweater. It is soft, and comfortable. It is a shorter more flattering length than the longer cardigans. It is very warm and I have used it as a light jacket. The first time I wore it, I went shopping in Camden, Maine and one of the shopkeepers suggested I should make and sell them. 

Even though I have no interest in doing this, I was pleased to have the notice of how beautifully it had turned out.

The Next Sweater Project
I am going to try it again,  in another fiber. I will stick to the bulky fast knit up yarn and dye colors that harmonize.
I will try to keep closer track of the steps next time,  so I can give you a more detailed pattern this time around.
So, if you see me running around Maine in my funky pilly sweater, stop and say Hi.

Sunday, March 28, 2010

How To Make Needle Felted Bowls-Part 1

In this article I am going to give you the basic instructions for making a needle felted bowl.  Please feel free to email me or leave a comment if you have questions or need more information on any of the steps.

Materials
Wool- I recommend you have at least 8 ounces of various colors.
( I generally stay away from Merino as I don't want that really tight flat finish that Merino gives. I use Corridale or something similar. I am a handspinner so I often have stuff lying around. If you are not and are buying some wool, I would look for Corriedale wool for this project.

If you make more of these later on, you can experiment to see what fibers you like best. 

Additional optional embellishments that really make the bowls lovely if you have access or really get into it like I have and want to get more supplies.
pieces of wool or mohair yarn
mohair blend or fiber
Other feltable blends with wool, silk, and other animal fibers.
These will go on the final layers and you will not use them at the beginning.


Felting needles of a large or medium size or a felting tool like the Clover Felting Needle Tool


A foam mat

Something soft that you can put on the inside of your bowl as you shape to hold the bowl shape. I use a zip lock bag full of old yarn, or a smaller piece of foam cut and rolled into a round sort of shape.

Basic Steps
The Base
I start with basic felting wool for the first steps. The clover wool works well like the Clover Wool Roving Assortment B Lime Green, Teal, Orange and Violet)


I start shaping a round flat base of the size I want the bowl bottom to be. Keep felting and adding to it until it is starting to feel firm and solid.  In later steps, you can add decorative colors, but don't do this now if you plan to.  Just get a basic firm shape.

Adding the Sides
There are two ways to do it that I have found.  You are going to be shaping the bowl as if it were a piece of pottery.  You can use a coil that you keep wrapping around or you can make a flat side of the height you want for the finished bowl and attach it. The choice of method will affect the shape of the bowl.
The flat material side will give you a straight sided bowl. The coil method will give you a bowl that can turn in at the top.

This bowl was made using the flat method.
You can see that it has rather
sides.


 This second bowl is made using the
coil method. It has a much more
rounded shape at the top. I like
the artistry of the coiled ones. This one I left pretty thick. It really looks nice with dried twigs or bittersweet in it.
 

Once you have decided on your method, we can begin attaching the sides.  We will be working on getting the shape first, then adding fiber to it later on.  As you work, you will want your felt to be firm enough to hold together, but you don't need to have a finished look yet.  If you are coiling there will be spaces between the coils that you will have to go and fill in on a later phase. I will tell you more about this later on. If you are using the flat piece method you won't have so much filling in to do, just adding your final layers at the end.


How To Make Needle Felted Bowls Part -2 can be accessed here

How To Make Needle Felted Bowls - Part 2


At this point in the bowl making process you should have your base, and have decided which type of sides you are going to use.


Just in case you missed the first part, here is Making Felted Bowls-Part 1

Whichever way you choose, you will be starting with the base you made in Making Felted Bowls- Part 1.

You have a choice of two ways to attach or build up the bowl sides.
You will choose what I call the coil method or the flat side method.
I will go through each way of making your finished bowl.


The Coil Method.
Take a piece of roving about 1 inch thick and 6 or 8 inches long, and twist it slightly. Attach one end to your base and start felting at the base. You want to felt it in from the side, top and bottom with your felting needle so it hold well in place.

Continue to twist your roving or fiber gently and continue felting it in as you go around.

You will be making a coil that continues around the bowl.

The best way I can describe it is that it is like making a pottery bowl or one out of play dough, if you have ever done this.

Be careful not to get it to tight. You want the coil to start to move out as you work on the bowl until you get about to the middle of the piece and then start back in slightly to form a bowl shape. If you start pulling in too much at this stage, it is hard to get it going out the way it should.

As you felt in your coil, keep adding pieces of roving onto your coil and twisting it in to make a continuous piece. You don't need to twist it tightly, just enough to form a loose coil.


You will want to keep working the felt as you go to make sure it holds it's shape.

You are building your bowl up with the coil a little at a time.


A couple of things to be aware of are:


Your bowl will shrink as you work it. Make it just a bit bigger than you want it.

The more you work the felt with the needles, the tighter the felt will become and the thinner.

After you have your basic shape, you will need to add pieces of wool in between the coils to make sure you have a somewhat uniform thickness.

I use my fingers to feel for thin spots and fill in.

During the first stages, you may have places where you can insert your finger, it is so thin between the coils. Don't worry about this. You can go back in any where add more fiber.

Once you get to the basic shape you want, and have filled in between the coils in thin spots, you can start shaping the bowl.


If one side is a bit too high, or it is seems a bit lopsided, you can use your felting needle to shape it.

At this point, I often insert something inside the bowl I can felt against to help shape the bowl. I use a baggie of yarn ends or another piece of soft foam.

Finishing

If you are using other fibers as a top layer, you can now add your more expensive and exotic fiber at this stage. I felt in little pieces of yarn. I use mohair in little coils, sometimes letting some stick out.

Some fiber will not felt very well.

Mohair with it's luster and color or another fiber blend can add a special touch to your finished bowl.

Mohair, although beautiful will sit on the surface and you will have to work at poking the ends in so that it stays well. I love this look, but some prefer a bowl that is tighter.

Keep shaping until your bowl is the shape you want, and the firmness. Keep making it tighter, and refine the shape as you work it more.

Keep checking for a somewhat uniform thickness and no thin spots.

Be careful not to add too many layers unless you like a thicker bowl in the end.

You may need to work the inside and from the bottom to make sure it is all well felted.
Here is a bowl decorated with mohair and yarns.  This one was made by a friend of mine.  Unfortunately, my puppy got hold of it and that is why it looks a bit  crooked.  Felting around the top and on the left side would help to make it a more uniform shape again.   You can see the yarns weaving on the top right edge, and on the sides.  All of the colors are individual pieces of dyed roving felted on separately.


The Flat Side Method

For the flat side method, you are going to make a flat piece of felt that will wrap around your bowl at the base. This works best if you have a larger base.

You will be starting with the base you made in part one of this article.


Make your flat piece of felt a bit higher than the height of the finished bowl.

Layer your roving on and start felting on your foam. You can keep it loosely felted.

Once it is so that it will hold together and is a solid piece of felt, you will start to attach it at the base of the bowl.

To attach, push your needle in along the base from the side, top, and from inside to attach. You will need to felt a seam to attach the two ends where they meet.


It works best if your felt is not too tight in this stage.

Once it is attached, you will have a floppy looking piece that collapses in itself.

At this stage, you will need something to put inside that you can use to shape and hold your felt as you work. ( A bag of yarn ends in a plastic bag or another soft piece of foam works well.

You will continue now to add fiber, shape, and tighten your piece.


Make sure you felt the inside seam at the bottom as well as form the outside. I like to add colored wool both in and outside of the bowl.


You can turn the bowl inside out to work on the inside, especially in the first stages of working on it.


As you felt, pay attention to your base. Make sure it is staying flat and that you have a good base to sit on so it does not lean when it is done.

There you have it as best as I can explain without you being here with me working.

Let me know if you need more help with this.

Plunge in and have fun.

Watch out. These bowls are very addicting. 

I have sold them, used them for rings, and jewelry, dried flowers, and just beautiful decorations in my home.

I have wanted to hang beads and dangles, but have not gotten to that. Perhaps, you will be the one to take them to that next level.

Send me pics. I would love to see them.

Debbie

Where To Find Foam For Needle Felting

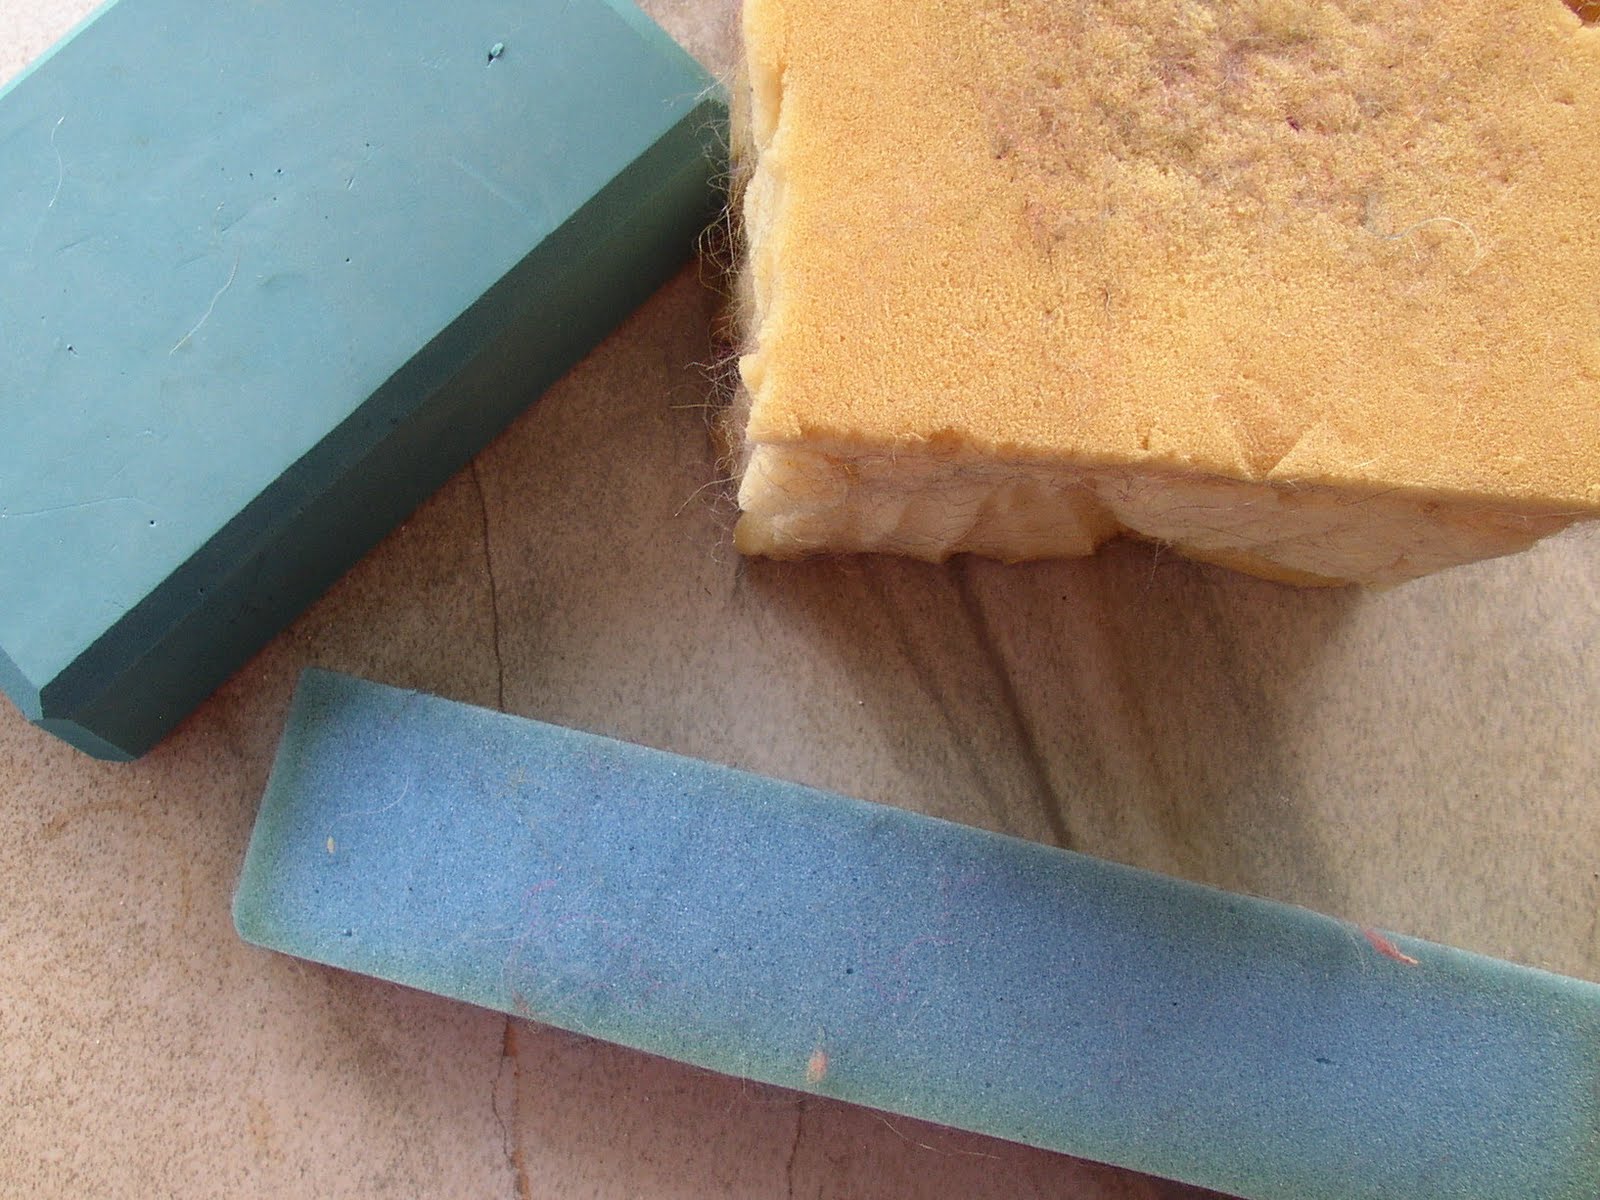
Some kind of foam is helpful and really necessary for needle felting.  The photo here shows a yoga block on the upper left, a thick piece of chair cushion on the right, and a thinner piece of foam that came with a computer I bought as packing.


The foam supports your work as you felt.  The other purpose the foam serves is to protect you from stabbing yourself with the felting needles. Ouch.  They are sharp. They are barbed and they really can hurt going in to your hands, knees, legs or whatever they are facing when they inflict their wounds.

I have many times been happily jabbing  with my felting needles and BAM- I  get stabbed in the leg or finger.

These days I usually use a thick piece of foam because I am forgetful and easily will puncture myself  If I am not careful.

In addition to using foam underneath the piece to support it and me, I often have a piece of various sizes inside my work to support it as I shape it.  For the felted bowls in this series, you will either need a piece of foam the right size to go inside your bowl as it gets made, or some other soft object that can serve the same purpose. ( I sometimes use a plastic bag filled with old yarn ends)- This will become more clear in the next article.
If you purchase a kit, or foam from a store for felting, it is usually firm but not really hard.  This helps keep the needles lasting longer.

I have found my own supports that I like, and have never purchased one.

Basically, any piece of foam large enough to use and thick enough is worth trying out.  You may have something lying around the house that can be used. An old  foam or fiber pillow with the cover removed, a piece of foam that was shipped with a computer or other object.

My two favorites are an old thick chair seat I cut into blocks, and a yoga block that I no longer use.

Even when I did yoga,  I never really used the block, so I didn't mind sacrificing it. 

I literally found the big chair cushion on the side of the road.  I am a big believer in law of attraction and in fact, have a website about it called  flowingmiracles.com in case you want to visit me there.

  But anyway, about the foam.  I was driving along and I was thinking about a needle felting class I was going to teach at a local yarn shop later in the week.  I was wondering what I would use for foam for the students in case there were a lot of them.  I noticed this thick seat cushion  on the side of the road that had probably fallen off someones truck or car while moving furniture.  I stopped, brought it home, cut it up, and washed it.  It was pretty filthy.

The blocks are not too pretty where I hacked them with a knife but it works great. It is very thick-about 5 inches.

You don't need to spend money to find foam for felting. Most likely you have something lying around that you can use.  Experiment until you find something you like.

Friday, March 26, 2010

Learning How To Needle Felt- Basic Felting Introduction

If you have not tried needle felting, I highly recommend it.  It is so much fun. You can make animal figures angels, all kinds of sculptural shapes. You can also make lots of other things like the bowls I showed you in my last post.

  These were made with basic needle felting methods.  The next article in this series will have the instructions for them.


First, let me say, needle felting is  really pretty simple.  You have very simple tools, and materials.  Felting needles, and  a foam mat of some kind  to keep you from stabbing yourself, and to support your work as you felt.

You also need a material that will felt like wool or similar animal fibers.  Usually wool is the standard material for felting.

It is helpful to have an understanding of basic felting to see how it works.  Wool fiber has barbs in it that you cannot see. When you felt, you are locking the barbs together and once they lock, it is permanent.

If you have ever felted ( hopelessly shrunk)  your favorite wool sweater or socks in the washer, you know just how permanent it is.

There are various ways to make felt. We are going to be doing what is called dry  felting, or needle felting.

If you are new to needle felting, I would recommend you purchase a how to  book unless you have someone who can teach you.  I like Beginner's Guide to Needle Felting by Susanna Wallis.

To felt, you are going to need felting needles. They are sharp barbed metal tools.  You will need to purchase more than one,  as they will break frequently especially when you are learning .

I use a felting tool which is a holder that hold three or four needles at a time.  It makes the project go much faster and saves on your hands and wrists.  I use the Clover Felting Needle Tool


Needles also come in different sizes from finer to larger. You might want to experiment with different sizes. I use large needles for my bowls because it goes faster. I am impatient, I have to admit.

If you don't have any wool or supplies, you might want to get a Felting Starter Kit that has everything in it.  That way, you won't have lot invested at first until you try it out.

A kit has the needles, wool, and a small mat.  Make sure you pick up a couple extra needles, if the kit only has one.

If you are going to try a bow, here is the materials list.

Felting needles- Medium or large size
Wool  -at  least 2 ounces.  ( How much you use for a bowl, will depend on the size- 2 oz. will make a small starter bowl.  I use up to 8 ounces in some of my larger bowls.)
Corridale is a good basic wool for this project.
If you want to embellish your bowl, you can also use mohair fiber blends, pure mohair, and other silk and wool blends in small amounts for the final layer.
A working mat of foam. It can be a soft styrofoam, or a softer foam like you would have in a seat cushion. You might have something lying around the house that you can use. If you use soft foam, it should be fairly thick so you don't stab yourself. It hurts.

Next time---
Drumroll please......
How to make the bowls.

Sunday, March 21, 2010

Introducing My Needle Felted Bowls

I have gotten into making felted bowls.
Ta Da- Here they are photographed on my Coast of Maine Lichen covered granite rocks.
I got started making them one day on a whim. The first one I did was about 18 inches around and really colorful.  I wish I had saved a picture of it. I ended up selling it when a friend  asked it if she could buy it. 
The ones here in the photo are about 8 inches for the large one, 5 inches for the middle one, and 4 inches for the smaller one.  The middle one was made by my friend Eileen, when we got together to learn how to make them one day last winter.

I have to say it is very addicting.  People who see them often ask me to teach them how to do it.  I have shown lots of  non fiber types how to make them too. They are addicting to make for artist types, to say the least.

I am proud to say, I invented the ones I make myself.
I have seen lots of knitted or crocheted and felted bowls, but none like mine. I imagine there are people making them like I am, but I have just never come across any.

I like needle felting, but am not into gnomes and all the animals and things I see made with felt. I like things that are practical and usable like- uh, bowls.

They can be used for all kind of things. I use mine for rings, change, and all kinds of little things on the windowsill, and in the bedrooms. I also love to put dried flowers in them, or even real flowers. With the real flowers I insert a glass jar or bowl inside the felted one that you can't see and put the water in there.

The bowls are lovely, and if you make one, you will have them all over the house.
I use lots of leftover fiber bits and blends including silk, wool, even angora. Some things go in better than others. Wool is the best and wool blends. the angora tends to sit on as a surface decoration more. I like the effect and it gives the bowls a lot of luster and character.

I don't use a pattern for my bowls or a form. I just shape them as I go adding more colorful layers inside and out as I near the end of the process. I like to make my bowls fat. Unless you are willing to work at them a really long time, they do tend to be thicker than crocheted felt bowls that are washed in the washing machine.

They are also not as tightly felted. I love the fact that you can shape them like pottery as you work.
I am putting them here today as I wanted to show them to you. 

Later this week, I will take some pictures of the steps I use to make them and post them on the site so you can try to do one yourself.

I hope you have some fiber fun this week,
Debbie

Tuesday, March 16, 2010

Where To Buy Purple Rose Fiber Yarns

As of this writing, I am not selling yarn in shops any longer.
I have limited time available for dyeing and getting it out there to wherever you are.

I do love dyeing yarn, and want to keep at it a bit, so for now-
My yarns are exclusively available through Etsy at   http://purplerosefiber.etsy.com

Etsy
Buy Handmade
purplerosefiber

Monday, March 8, 2010

Ah Spring-Dangerous Season For Handspinners

Spring is approaching in the northeast US.  I am starting to get notices from farms in our area of sheep shearing days, and the fiber fairs are not far off.

.
One particular farm here in Coastal Maine sent me an email today of their shearing day coming up in a few weeks. I have gone to this and it is a lot of fun. You can help move the sheep into the pens for shearing and pick your fleece as it is being taken off the sheep. You can also help skirt the fleeces out as they come off on the table before they are rolled up. In this process, the short fibers and those covered with manure on the edges are pulled off and discarded, leaving only the prime beautiful fleece to be purchased by some addicted hand spinner like myself.

It is really exciting to watch the fleece coming off the sheep, and examine it at a respectful distance for crimp, color, luster, cleanliness, and all the other things a spinner looks for. The shearer is fast, and the poor sheep doesn't really know what happened until it is over. They shearers are super skilled and can clip around all those delicate areas without injury to the animal. The fleece comes off all in one piece.  I am always amazed watching the process. 

You can choose your fleece or fleeces for the seriously addicted, as they come off the animal.
That is, you can if you are fast enough.  I often wait too long and watch someone snatch up the one I have my eye on.
 Not to worry though, as there are plenty more coming along. Grey, chocolate, various shades of brown, and white- colors of fawn and apricot.  The beautiful clean fleeces from covered or well cared for sheep are a delight to behold.

I love the smell.  It is a smell of lanolin and manure. Why I like it, I am not sure as I suppose many would find it unpleasant. I enjoy the feeling of the lanolin on my hands after touching the fiber.

Each fleece has it's potential to be washed, possibly dyed, spun, and then knitted, crocheted or woven into wonderful and practical  things.

I think what really keeps me coming back for this year after year is the potential at the start of a new project or venture.  It is all possibility.  The reality that there are seven other fleeces in the closet, or stacked on the porch that still need to be spun does not really enter ones mind.  The potential for these new and wonderful fresh piles of fiber to become something beautiful overwhelms all sense of practicality.

My thrifty Yankee spirit is pleased, that for a few dollars I can have such a pile of possibility in my grasp.

When I get my fleece home, I start the process of steps to prepare it for spinning. Hopefully I have only bought one as they can weigh several pounds. Sometimes it is three or four, and I only really can spin one or two a year. If you can do any math at all, you can see what a problem is building here. This leads to the saying that the one who dies with the most fiber wins.  At this stage of the project though, that is of no concern. Trying to talk sense into me will do no good. I have gone over the edge, and will not be talked out of my folly.

I love to wash the locks gently in small quantities, and lie them in baskets to dry on my deck in the warm spring air.  I love to see the color change as the barn dirt and manure are soaked out and a yellow fleece suddenly turns to snow white. On one or two days in spring, I usually dye up a bunch of these gently washed  locks and spend many days admiring all the pretty colors as they dry in baskets around the house. The possibilites are endless at this point.

I am not one to dye my wool with a project in mind. I usually dye it as the mood strikes me in my favorite colors and then decide what I will use it for.

Sadly, I have to admit that once I get to this step, it often ends up in the closet unless I send it off to be carded by a professional. Carding, for you non hand spinners is the process of combing that prepares the fiber so that it can be spun easily on the spinning wheel into yarn. It is also the time when the colors can be mixed as much or as little as you like to make all kinds of color blends that end up in the finished  yarn.

Many hand spinners now days like to buy their fiber prepared, dyed, and ready to spin. I  can appreciate this, as the process of preparing the wool from start to finish is labor intensive. I myself, would not want to miss this spring ritual that has become a delight  that I look forward to year after year.
(photo courtesty of photobucket/ user whitestone 25)

Wednesday, February 3, 2010

Dye Yarn With Easter Egg Dyes

The next time you are dyeing your Easter eggs, consider using the leftovers to dye a skein of yarn. This recipe works with any wool yarn that is made of protein.  The yarns I dyed have been  very permanent and Color fast. I did my first skein in 2006. No fading yet.  I can't say over the long term how much they could fade. Since I have seen no change in 5 years from these original yarns,  I am not too concerned about it.   It is loads of fun, and you will have yarn in those lovely Easter Colors we all love so much.

The first time I tried this it was on a whim. I thought what if I could dye with this? I did and I really got my money's worth out of my Easter Egg dyes.
I ended up having so much fun, I went out after Easter buying up all the sale packets of dye.  I dyed about 5 skeins with it using all the colors, and my microwave. The yarn came out so pretty and I used it in projects for kids. The colors were perfect for them and non toxic all the way. They were light baby colors when they came out. Later, when I went out and bought  more packets, I got stronger colors. I used a bit less water, and in some cases two tabs. 
Here is the way I did it.

After I was done using all those little cups of dye, I added about a 1/4 cup of vinegar to each one.  I used coffee cups by the way.  
I soaked my wool in warm water with a cup or vinegar for about 20 minutes and then took most of  the excess moisture out with a towel. This helps it to accept the dye better.
I draped the yarn into the different cups and arranged it on my microwave plate inside the microwave so I was using all the cups of dye at the same time.
I let it sit for a few minutes to let some of the dye run up into the white part between the cups.
I microwaved it for about 5 minutes.
The yarns above came out differently and I think it was the fiber because the strength was about the same. They were both very pretty when dry.

I took the yarn out, cooled it, and rinsed it gently in warm water with a bit of dish detergent added.


That's it. Nothing to it.
If you have some leftover wool yarn sitting around the house in white or a very light color try this.
You can use the skeins as I did, or you can put individual balls in the dye cups. If you use balls of yarn, they will be white in the middle and get darker as they go out to the edge.  Keep the balls small and wound loosely. 
You will feel so thrifty and have fun seeing the colors come out.
This was a later attempt with little water, and a pale pink yarn. It came out very nice.

Kool Aid Dyed Yarns- Have Some Fun

 Kool Aid Yarn Dying 
It is really cool
If you want to try yarn dyeing, using  Kool Aid is a great way to start. Kool Aid yarn dyeing  is surprisingly permanent, can yield some lovely colors, and is lots of fun. Kool Aid is great for dyeing because the whole process is non toxic, and only use simple household items you most likely already have. Most of us have some Kool Aid around. Just make sure it is the unsweetened kind in the small packets.  It is so much fun. If you have kids, they love doing it.  You just have to try it.

Kool Aid yarn dyeing works best for protein fibers which includes any animal fiber. Kool Aid is naturally acidic so they are perfect for this use.  The colors are surprisingly pretty, and permanent. I made a pair of angora mittens for my daughter when she was younger with cherry Cool Aid. The color was a lovely shade or warm cherry pink.  Even after several snow men, and outdoor play, the mittens are still just as nice and pink as ever. 
Tips To Know Before You Get Started

Make sure your yarn is in a skein. It should be tied in at least 4 places around the skein so it does not tangle in the pot. Keep the ties  loose so the dye can work around them unless you want lighter yarn there.
Move the yarns around carefully in the pot. Don't stir, or swish too much. Use a gentle simmer. The same goes for the rinse. No harsh changes in temperature while rinsing.  No rubbing. Just soaking, and if necessary a gentle swirl or two.  All of this will help your yarns keep from getting hopelessly tangled, and from felting.

If you are dyeing multiple skeins and want them to match, you will have to dye them all at the same time.

What You Will Need For Kool Aid Yarn Dyeing
For this recipe, we will use the stove and pots to dip or simmer the skeins.

Get Ready To Dye
Have Ready
Yarn soaked in 1/2 gallon of  warm water with 1 cup of white vinegar added  for  30 minutes. Make sure it is a protein fiber like wool or any other animal fiber
Large Cooking Pots- one for each color of Kool Aid
Water -  two quarts will cover a skein of sock wool in most cases for immersion dyeing.
White vinegar
Kool Aid- the small unsweetened packets. Use up to two for each skein dyed depending on how strong of a color you want.
A large  Spoon or a wooden dowel- The dowel can be used to loop the skeins over if you are dipping.  Your yarn  can be easily rotated around the dowel in such a way that the section you wish to dye next  hangs down  for the next dip into the pot. It is easier to control and keep the yarns neat with this method, and you can dye more than one skein at a time if you want.
Rubber Gloves
A colander to drain the yarn is helpful after it is dyed.  


Generally, things used for dying are not used again in the kitchen. However, with Kool Aid this is not necessary.  Another reason to Kool Aid Dye.


  Instructions For Mixing Your Colors

One quart of water to one packet of dye. Once you learn the process, you can experiment with more water or more Kool Aid to change the depth of the shade. I generally use at least two quarts per pot so the yarn is covered well. For two quarts of water, you will use two packets of Kool Aid powder.
Add 1/2 cup of white vinegar to each quart of water you use.  You can use your soaking water for this to save on the vinegar.
You want to have enough liquid in your pot to cover you fiber if you want a uniform color. For dip dyeing it does not matter.  


Directions For A Uniform Color Yarn
This is called immersion dyeing.  You will end up with a yarn all one color.

Add at least two quarts of water, two packets of Kool Aid, and 1 cup vinegar to your pot(1/2 cup per quart).  If two quarts will not be  enough to cover your skein, or if you are dyeing more than one, multiply the recipe so it covers all your yarn in the pot.  You want  the yarn free to move in the pot, and not crowded so it will dye evenly.
1. heat the water with the Kool Aid and vinegar added to a simmer-make sure it is stirred well and all the Kool Aid is mixed in evenly.
2. add your wet pre-soaked skeins

3.Simmer the fiber at a low temperature for about 30 minutes. Do not boil. If you are not doing any more dyeing, let it cool in the pot. Otherwise, take it out and let it cool to warm. Soak it in warm water about the same temperature as the yarn. Do not agitate the yarn while you are rinsing it.  Rinse until the water runs clear.


Directions For a Multi Colored Yarn
This is my favorite because it really lets you have fun dipping and sloshing you yarn into different colors.

You will need
A Pot for each color with one quart water, one cup white vinegar, and one packet Kool Aid
Yarn that has been soaked in the vinegar and warm water mixture for 30 minutes or more. 
Utensils and gloves to hold the yarn for dipping. I use a stick to drape the yarn over and move it around as I go from pot to pot.

Take your wet, but not dripping yarn and drape it in the pots. If you put a third in you will end up with at least three colors. Leave it in there until it is just a tiny bit darker than the color you want, take it out, and dip another end in another pot.
With this method, you don't need to leave the yarn in for the entire 30 minutes in each pot. I usually try to do at least 7 to 10  minutes to make sure the yarn sets. Since you have pre-soaked the yarn in vinegar before dying, it should be color fast after just a few minutes time.  I also increase the vinegar slightly to make sure it takes the color up really well. I have never had a problem using this method with colorfastness.

Kool Aid yarn dyeing is so much fun. You can dip as much as you want. You can leave some white between colors. You can put one end of the yarn in one pot and the other in a second pot.  You can dye one end yellow and then dip it red and turn it orange.  There is no end to the variety you can come up with.  It is also called space dyeing.


Tuesday, January 12, 2010

My Favorite Places To Find Yarn on Line

Where to get yarn.

Well, I will tell you were I like to hang out other than my local shop. I regret to say that I usually don't buy a lot of yarn there. I love to look,and browse. There are luscious yarns in my local yarn shop. It is  eye candy for the knitter, and there is lots to feel and touch there.

Sadly,  I don't buy there. I  love to support the little craft people here and there. Besides, I have a lot of my own yarn. I love to knit my own sock yarns that I dye. They are my favorite colors so they fit me really well.

I love to shop on ebay.com  for bargains.  It is hit and miss. Sometimes I get a yarn or fiber there though that is disappointing. I have learned to be a bit more discriminating, and this works better.
I also really like to shop at String of Pearls.com,  Check out the fiber treasures in the  yarn mine section at String of Pearls. You never know what you might find.
I also love Etsy sellers. Etsy.com
If you have not checked out etsy.com you really have to. There are some beautiful sock yarns available there from the sellers on etsy.
You can look by what was recently posted from the home page.
I have my yarns on there although I have to admit lately I have not been posting
much.  Perhaps this post will inspire me to get going.
My site can be accessed on etsy by clicking this link http://purplerosefiber.etsy.com
I posted a picture of a skein of my Ultra Merino Nylon Hand Dyed Sock Yarn up at the top of the page.
The colors remind me of the sea near my home on the coast.
If you have a favorite place to shop for yarn on line, post it here.

Thursday, December 10, 2009

Sock Knitting Books

Since dyeing sock yarns is mostly what I do at Purple Rose Fiber, it is no surprise I would be posting my favorite sock books here.
Sock knitting can be so addictive. If you have not tried it, you might want to. The only part that sometimes scares people off from trying it is the heel. If you take it one step at a time, you will be fine. I can post more about this in another later blog if people are interested.
Anyhow, here are some of the sock books I use on a regular basis.

Most are available at Amazon. I love to get my books there because they often have used copies. They also usually have free shipping if your ordering more than one book.
I love this interweave book "Favorite Socks " and return to it again and again.


This is another favorite. It is basic, so perhaps not so good if you like fancy socks. If you are a beginner at socks, I would recommend this one because it divides the project into three parts so you so you can work step by step as you go. There are easy variations to start with.


This is my absolute favorite sock book. It has lots of different variations from lacy socks to mens boot socks. A lot of the socks in here are knitted using handspun yarns. You would want to be comfortable with guage if you are not a handspinner. My copy of this book is not in pieces, I have used it so much.

Saturday, December 5, 2009

Knitting Project-What are you working on?

I always love the start of a new knitting project. I am excited, I love the colors, and have plans to have it done soon.
Then, as I go on it can take on many different forms. I can become frustrated with it and abandon it. Sometimes, I will get bored and let it sit in the knitting basket for months. At times, it has even been years. Other times, I am able to carry it through and actually get it done. To stay excited and motivated.

I admire people who start a project and then finish it in a nice orderly way. They don't start another until they finish the one they are on. Perhaps you are like that.

I, on the other hand usually have three or four going. Usually they get finished, but by that time I am bored with them, and the enthusiasm has worn off for me. Right now I have one sock finished as of 2 months ago, and the second yet to start. My idea to knit Christmas socks is not going to materialize. The sock has been a year in the knitting. I have a second sock in the same situation. Unfortunately, it is not a match for the other one.

I think at this point there is not much hope for me changing my ways. In spite of all this, I do love to knit when I can free up the time.

Today I started a bulky cardigan sweater of hand spun thick and thin yarn that I am designing loosely as I go. I am very excited about the way it is coming out and the colors. Hand dyed yarns in blues and greens. I will try to get a photo up later this week of the colors. I hope I can maintain this excitement and not drop the ball this time. We shall just have to see. I am going around the body in a circular needle and will go onto three needles when I get to the armholes. One for each front and one for the back of the sweater. I plan to knit in the sleeves because I am too lazy to sew it all together. First I will join it at the shoulder, add the sleeves, and then the collar and front trim at the end.
We will see how this goes. I am not usually so casual about it all. When I do knit this way though, I mostly have good luck and it turns out well as long as I stick to easy simple designs.

What is on your needles? What kind of knitter are you? Are you the neat finish it type, or the more casual disorganized type as I am? Or, are you a style all your own. How we knit must say something about who we are? I think this kind of disorganized, half baked style is very me. In the end though, I do come through. I will get to the goal, but I will end up on a winding path most likely. I will chose variety over consistency, and abandon my present path, if I find one that is more fun. This can make life challenging at times, and also fun.

Tuesday, December 1, 2009

Welcome to Purple Rose Fiber


Debbie here,

Welcome to Purple Rose Fiber. If you are a regular user of our site, you will see that our format has completely changed.

Purple Rose Fiber is also changing. A few years ago when we first started the website, we offered our yarn available for sale on our site. Now, I sell my yarn on Etsy.com when it is available. You can check out our yarns at this link. http://www.purplerosefiber.etsy.com. For the past year or two our site was used primarily to provide information about our yarns, and where to purchase them for our customers.

Purple Rose Fiber has always specialized in hand dyed sock yarns and other hand dyed yarns for knitters. Those of you who have knitted with our yarns know our colors are gorgeous. We are a small studio in Maine that is not open to the public.

Although my yarns will still be available in limited quantities on Etsy.com, I am allowing my self to get involved in new and exciting fiber things more and more.
I have been pursuing other passions on the internet in recent months including writing articles, and offering more content focused material. I love dyeing yarns, yet feel I am ready for a change.

I am setting up our new site to offer articles, links to resources, and recommendations for cool knitting, spinning, and weaving stuff for you to check out.
I am excited about this new venture with Purple Rose Fiber. I knew this change was overdue, because for the past months I found I have not been updating my site.

I hope you will check back often as the site evolves to see what we have to offer.
Thanks
Debbie