Sunday, March 10, 2013

Spinning Cotton form Seed. Why Not go for it.

   Spinning Cotton From Seed

I have never spun cotton. I have so much fiber now stuffed in trunks and pillow cases that I may never get to along with several projects lined up waiting in the cue of my imagination.

Right now, I am trying to hold the line and planning to use what I have.  It is much more fun to be in expansion mode for me, buying just about every fleece  I see that I can get my nose into. Ah, just the thought of the lanolin is so yummy. I have stayed away from a couple of fairs lately,  just because I knew I would not, or could not resist coming home with a fleece of two.
It is like standing in front of an ice cream stand.  Not a good idea unless I planned to eat the ice cream.

I like to buy fleece and go from the raw wool to the finished yarn. Dyeing, carding, and blending, sometimes mixing in other fibers such as mohair, or angora into the roving.
What do you like to spin or knit?  What draws you in? - the colors, the scents, texture, the finished project, or maybe all of it.

True confessions. How is your fiber or yarn closet managing?  Where are you stashing your stash?How many boxes and totes are hidden around the house stuffed to the brim? 

I think perhaps restraint is over rated.  Guilt is such a waste of time. I feel great when I am in the energy of just about to buy that fleece and get it home.  I can't wait to get the locks soaking in my slate sink. Get the dye pots out.
Yet, when the fiber is tumbling out of the closet and I don't even have any idea what is in there any more, it is so stuffed, perhaps it is time for  a bit of restraint or a bit of giving away.  I have given away yarn or fiber many times, much to the delight of the recipients, but then off I go again.

Anyway, back to cotton. For now, I will pass.  Or will I.  To be or not to be. To spin it or to live a boring life of guilt and restraint?  What side of me will win out?
If you want to try spinning it right from the raw seed, this video seems pretty cool.

Happy Fiber Frolicing,

Debbie

Sunday, April 22, 2012


If you want to try to dye self striping sock yarns, check out this cool video.

I am not sure I want to try it as I think I would get all the pieces tangled but it does look
interesting to try.

Happy Dyeing

Thursday, February 17, 2011

Canadian Production Wheel

The other day my friend Mary offered to trade her Canadian Production Spinning Wheel for a Carder that I wanted to sell. An offer I could not refuse.
I have a Lendrum, and a homemade upright wheel that spins bulky with a big flyer. I have to admit that I was a bit bored with spinning of late and my wheels have been just sitting for months.
The new wheel has given me a revived interest in  making yarn again.


I realized as I tried to work on my new toy that I was very challenged by the fast spin ratio. The Canadian Wheel has a supposed spin ratio or 20 to one rotation of the wheel. Frankly, it seems much higher to me. I guess I will have to count and see how close that is. Regardless, the wheel has  given me a whole new interest in the process.

You can really feel connected to earlier generations of women spinning on these wheels for practical and utilitarian reasons. It treadles very easily as long as it is kept well oiled. I love the heavy black iron parts and the metal that is part of this style wheel. 

I have started working on some mohair I had carded and dyed a couple years ago plied with Black Alpaca that also has been sitting in my spinning stash for some time.

Even though the wheel is designed to spin very fine yarn, I am spinning mine just a bit thicker as I like it and it is working out fine.
I am having trouble not over twisting and it will take me some time to get it right.
I am an impatient person and so, am knitting a hat as I spin each ball. The wheel has small bobbins and only one on mine so I am making skeins about 2 ounces each once plied.

Here is a picture of the hat as a work in progress on 8 circular needles.
It is very dark blue combined with black and was hard to photograph.
The hat is popcorn stitch and my usual no pattern designs. To decrease at the top section, I knit 3 together instead of 2 as I went around so I could keep the pattern going.


I will post it when it is done very soon. 

Monday, January 17, 2011

Will I Use Bulky Merino Again? My finished Merino Sweater Project

The Sweater Is done

I finished my bulky handspun sweater project finally.  Although it was pretty easy,  it took me a long time.

Lots has gone on this year in my life including a major move to a new house and the loss of my father.
My projects got scattered, and I was lacking in energy to look for them for a few months after my Dad died in April.

I was also limited to my little dell notebook over the summer and it is so painfully slow, I ended up neglecting my web site too, my Etsy store, and just let it all go.  I moved into my new house the end of October, and am now starting to get my life back.

It feels good to be back!

The Project
The sweater project was to knit a free style no pattern sweater from hand spun yarns I created and dyed. I used mostly Hand Spun Bulky thick and thin merino. It is, or perhaps I should say -was beautiful yarn. On the down side,  the yarn ended up pilling very badly. I have worn the sweater almost daily at home for a month and it already looks like a four year old garment. I had been told previously that  Merino pills, but I have never experienced it with the yarns  I use. The merino in my sock yarn, and the others I dye and use for socks do not seem to have this problem. I  think it is because this yarn was so lightly spun as I constructed it to be bulky and soft.

I still do love the sweater and plan to make it agian in another fiber, Blue Face Leicester perhaps. The colors are gorgeous.  As I knit, I ended running out of the merino and substituted some other hand spun yarns in multiple strands to keep the guage as close as possible as I went along. This was one of those unplanned things that made the sweater turn out even nicer in the end.


The How Of Making This Cardigan Sweater
Using size US 13 needles,  I measured around my hips, did a guage sample, and figured out how many stitches would fit loosely around my body.  After casting on the stitches that would go all the ways around me, I ribbed a few inches with 11 needle.  I then switched to 13 needles and  knitted up to my underarms in all one piece. I used  98 stitches to fit my size.

As I knitted, I kept checking and when the length measured from nine inches below my waist  at the bottom and  my arm pit  at the top, I divided the piece onto three needles.  I put the first 1/3 of the stitches on a circular needle, the second third on a larger 13 circular, and the final third on another. I continued to knit up each of these 3 pieces separately until I reached 2 inches below my shoulder line.  I chose to knit all three at once so I could make sure I would not run out of a particular color and would remember the color changes as I went a long.  I did this by attaching a ball to each piece of the color I was using and then attaching a new color on each at the same place on each section.

At the two inch before the top of the shoulder mark, I started decreasing a few stiches on each of the  two narrower front sections every other row where they would join at the neck.  Because I was using such big needles,  I only had about 8 rows to do this in so I decreased 4 times of 3 stitches each decrease.
On the bigger back piece, I just knitted up these 8 rows. Next I bound off, leaving one piece of knitting.

At this point, I sewed the shoulder seams together on each side. Then,  I knitted on the two arms at the shoulders on  13 circular needles. I measured my stitch's per inch and used that to figure out how many stitches to cast on to the arm.  It came out to about 60 for my sweater. I knitted the sleeves around so there is no seam.  I did both arms at once with two circular needles.  I knitted the arm for 5 inches, and then started decreasing.   As I went along, I gradually decreased the number of stitches by knitting two together in about every third row.  I joined my colors on each sleeve so they would match on both sides.

At the bottom of the sleeves, I switched to 11 needles and ribbed, casting off at about 3 inches of rib.  I measured as I went along on my own arm to make sure the length would be just right for me.

The final step of this sweater was to complete the collar and front bands.  I  knitted on enough stitches to the neck to fit comfortably around my neck. I  rib knitted K1, P1,  around the top of the neck with the 11 needles. 

After I did this, I planned out the front bands.  I used my guage to figure out the number of stitches I would need, and then knitted on the left band and ribbed for the desired width. I casted that side off.  I used the 11 US needles and K1, P1 rib.
I then knew how many stitches would go on the other side where the buttons holes would go. I laid my buttons out on the completed side to see how they would space out.

I decided on 7 buttons and figured out how many stitches I needed between button holes. The stitches did not come out exactly even so I had to plan and extra stitch in between two of them. I planned to use two stitches for each button hole and figured this into my math.   I drew it out first so I would  be clear about what I was doing before I started knitting and how many stitches I would leave between each of the button holes as I worked theses.

To start the second band, I knitted on the required number of stitches I used on the other side.  I knitted two rows of rib  and then started the button holes continuing the rib pattern. I planned to cast off two stitches and then add it back in on the following row. This is a really simple way and there are more finished ways to do button holes.  I wanted this to be a really simple fun knit so I did just simple easy techniques throughout. After I finished the button hole side and casted off.

The Finish
I found some old leather buttons that added a funky touch to the sweater that I really liked. They were all different and some were a bit bigger. It worked. I made sure they fit through the button holes, of course before I sewed them on my sweater.  After attaching the buttons, I  wove in any loose ends in the yarns from the back of the sweater,  and  then came the best part.  I  adored myself in my new garment. 

I love wearing the sweater. It is soft, and comfortable. It is a shorter more flattering length than the longer cardigans. It is very warm and I have used it as a light jacket. The first time I wore it, I went shopping in Camden, Maine and one of the shopkeepers suggested I should make and sell them. 

Even though I have no interest in doing this, I was pleased to have the notice of how beautifully it had turned out.

The Next Sweater Project
I am going to try it again,  in another fiber. I will stick to the bulky fast knit up yarn and dye colors that harmonize.
I will try to keep closer track of the steps next time,  so I can give you a more detailed pattern this time around.
So, if you see me running around Maine in my funky pilly sweater, stop and say Hi.

Sunday, March 28, 2010

How To Make Needle Felted Bowls-Part 1

In this article I am going to give you the basic instructions for making a needle felted bowl.  Please feel free to email me or leave a comment if you have questions or need more information on any of the steps.

Materials
Wool- I recommend you have at least 8 ounces of various colors.
( I generally stay away from Merino as I don't want that really tight flat finish that Merino gives. I use Corridale or something similar. I am a handspinner so I often have stuff lying around. If you are not and are buying some wool, I would look for Corriedale wool for this project.

If you make more of these later on, you can experiment to see what fibers you like best. 

Additional optional embellishments that really make the bowls lovely if you have access or really get into it like I have and want to get more supplies.
pieces of wool or mohair yarn
mohair blend or fiber
Other feltable blends with wool, silk, and other animal fibers.
These will go on the final layers and you will not use them at the beginning.


Felting needles of a large or medium size or a felting tool like the Clover Felting Needle Tool


A foam mat

Something soft that you can put on the inside of your bowl as you shape to hold the bowl shape. I use a zip lock bag full of old yarn, or a smaller piece of foam cut and rolled into a round sort of shape.

Basic Steps
The Base
I start with basic felting wool for the first steps. The clover wool works well like the Clover Wool Roving Assortment B Lime Green, Teal, Orange and Violet)


I start shaping a round flat base of the size I want the bowl bottom to be. Keep felting and adding to it until it is starting to feel firm and solid.  In later steps, you can add decorative colors, but don't do this now if you plan to.  Just get a basic firm shape.

Adding the Sides
There are two ways to do it that I have found.  You are going to be shaping the bowl as if it were a piece of pottery.  You can use a coil that you keep wrapping around or you can make a flat side of the height you want for the finished bowl and attach it. The choice of method will affect the shape of the bowl.
The flat material side will give you a straight sided bowl. The coil method will give you a bowl that can turn in at the top.

This bowl was made using the flat method.
You can see that it has rather
sides.


 This second bowl is made using the
coil method. It has a much more
rounded shape at the top. I like
the artistry of the coiled ones. This one I left pretty thick. It really looks nice with dried twigs or bittersweet in it.
 

Once you have decided on your method, we can begin attaching the sides.  We will be working on getting the shape first, then adding fiber to it later on.  As you work, you will want your felt to be firm enough to hold together, but you don't need to have a finished look yet.  If you are coiling there will be spaces between the coils that you will have to go and fill in on a later phase. I will tell you more about this later on. If you are using the flat piece method you won't have so much filling in to do, just adding your final layers at the end.


How To Make Needle Felted Bowls Part -2 can be accessed here

How To Make Needle Felted Bowls - Part 2


At this point in the bowl making process you should have your base, and have decided which type of sides you are going to use.


Just in case you missed the first part, here is Making Felted Bowls-Part 1

Whichever way you choose, you will be starting with the base you made in Making Felted Bowls- Part 1.

You have a choice of two ways to attach or build up the bowl sides.
You will choose what I call the coil method or the flat side method.
I will go through each way of making your finished bowl.


The Coil Method.
Take a piece of roving about 1 inch thick and 6 or 8 inches long, and twist it slightly. Attach one end to your base and start felting at the base. You want to felt it in from the side, top and bottom with your felting needle so it hold well in place.

Continue to twist your roving or fiber gently and continue felting it in as you go around.

You will be making a coil that continues around the bowl.

The best way I can describe it is that it is like making a pottery bowl or one out of play dough, if you have ever done this.

Be careful not to get it to tight. You want the coil to start to move out as you work on the bowl until you get about to the middle of the piece and then start back in slightly to form a bowl shape. If you start pulling in too much at this stage, it is hard to get it going out the way it should.

As you felt in your coil, keep adding pieces of roving onto your coil and twisting it in to make a continuous piece. You don't need to twist it tightly, just enough to form a loose coil.


You will want to keep working the felt as you go to make sure it holds it's shape.

You are building your bowl up with the coil a little at a time.


A couple of things to be aware of are:


Your bowl will shrink as you work it. Make it just a bit bigger than you want it.

The more you work the felt with the needles, the tighter the felt will become and the thinner.

After you have your basic shape, you will need to add pieces of wool in between the coils to make sure you have a somewhat uniform thickness.

I use my fingers to feel for thin spots and fill in.

During the first stages, you may have places where you can insert your finger, it is so thin between the coils. Don't worry about this. You can go back in any where add more fiber.

Once you get to the basic shape you want, and have filled in between the coils in thin spots, you can start shaping the bowl.


If one side is a bit too high, or it is seems a bit lopsided, you can use your felting needle to shape it.

At this point, I often insert something inside the bowl I can felt against to help shape the bowl. I use a baggie of yarn ends or another piece of soft foam.

Finishing

If you are using other fibers as a top layer, you can now add your more expensive and exotic fiber at this stage. I felt in little pieces of yarn. I use mohair in little coils, sometimes letting some stick out.

Some fiber will not felt very well.

Mohair with it's luster and color or another fiber blend can add a special touch to your finished bowl.

Mohair, although beautiful will sit on the surface and you will have to work at poking the ends in so that it stays well. I love this look, but some prefer a bowl that is tighter.

Keep shaping until your bowl is the shape you want, and the firmness. Keep making it tighter, and refine the shape as you work it more.

Keep checking for a somewhat uniform thickness and no thin spots.

Be careful not to add too many layers unless you like a thicker bowl in the end.

You may need to work the inside and from the bottom to make sure it is all well felted.
Here is a bowl decorated with mohair and yarns.  This one was made by a friend of mine.  Unfortunately, my puppy got hold of it and that is why it looks a bit  crooked.  Felting around the top and on the left side would help to make it a more uniform shape again.   You can see the yarns weaving on the top right edge, and on the sides.  All of the colors are individual pieces of dyed roving felted on separately.


The Flat Side Method

For the flat side method, you are going to make a flat piece of felt that will wrap around your bowl at the base. This works best if you have a larger base.

You will be starting with the base you made in part one of this article.


Make your flat piece of felt a bit higher than the height of the finished bowl.

Layer your roving on and start felting on your foam. You can keep it loosely felted.

Once it is so that it will hold together and is a solid piece of felt, you will start to attach it at the base of the bowl.

To attach, push your needle in along the base from the side, top, and from inside to attach. You will need to felt a seam to attach the two ends where they meet.


It works best if your felt is not too tight in this stage.

Once it is attached, you will have a floppy looking piece that collapses in itself.

At this stage, you will need something to put inside that you can use to shape and hold your felt as you work. ( A bag of yarn ends in a plastic bag or another soft piece of foam works well.

You will continue now to add fiber, shape, and tighten your piece.


Make sure you felt the inside seam at the bottom as well as form the outside. I like to add colored wool both in and outside of the bowl.


You can turn the bowl inside out to work on the inside, especially in the first stages of working on it.


As you felt, pay attention to your base. Make sure it is staying flat and that you have a good base to sit on so it does not lean when it is done.

There you have it as best as I can explain without you being here with me working.

Let me know if you need more help with this.

Plunge in and have fun.

Watch out. These bowls are very addicting. 

I have sold them, used them for rings, and jewelry, dried flowers, and just beautiful decorations in my home.

I have wanted to hang beads and dangles, but have not gotten to that. Perhaps, you will be the one to take them to that next level.

Send me pics. I would love to see them.

Debbie

Where To Find Foam For Needle Felting

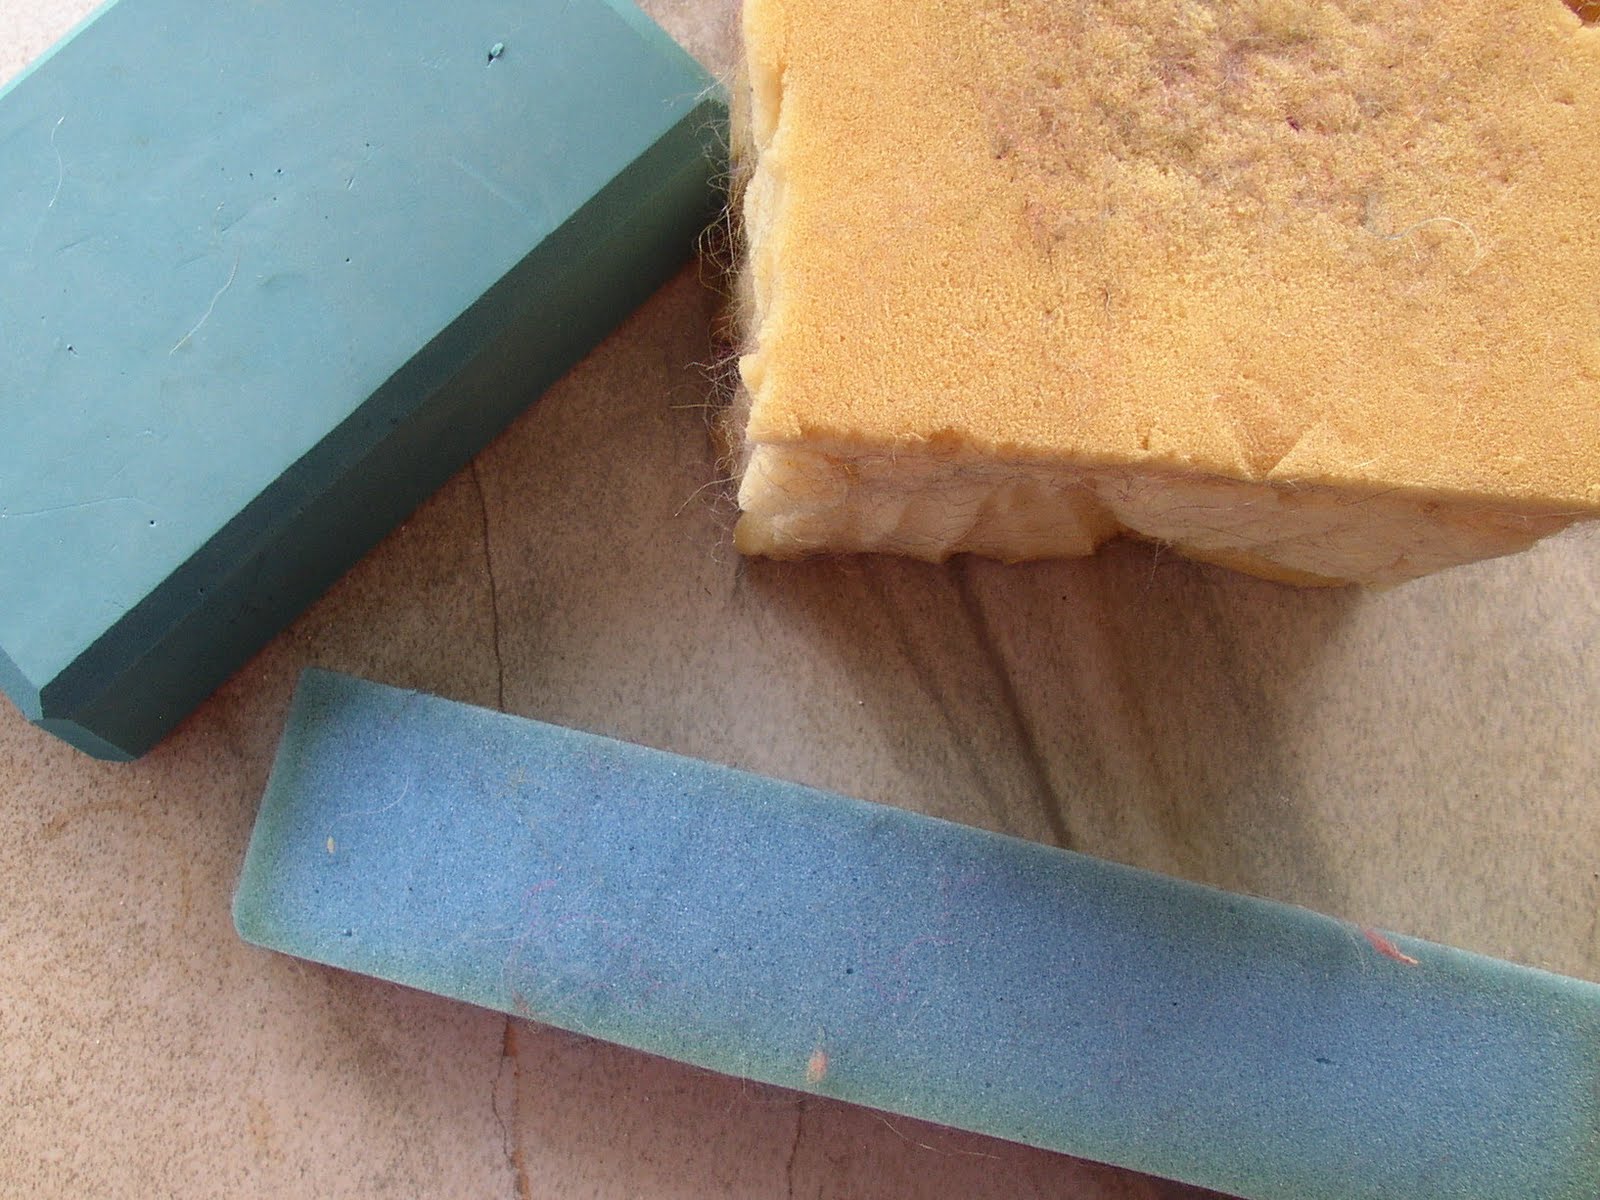
Some kind of foam is helpful and really necessary for needle felting.  The photo here shows a yoga block on the upper left, a thick piece of chair cushion on the right, and a thinner piece of foam that came with a computer I bought as packing.


The foam supports your work as you felt.  The other purpose the foam serves is to protect you from stabbing yourself with the felting needles. Ouch.  They are sharp. They are barbed and they really can hurt going in to your hands, knees, legs or whatever they are facing when they inflict their wounds.

I have many times been happily jabbing  with my felting needles and BAM- I  get stabbed in the leg or finger.

These days I usually use a thick piece of foam because I am forgetful and easily will puncture myself  If I am not careful.

In addition to using foam underneath the piece to support it and me, I often have a piece of various sizes inside my work to support it as I shape it.  For the felted bowls in this series, you will either need a piece of foam the right size to go inside your bowl as it gets made, or some other soft object that can serve the same purpose. ( I sometimes use a plastic bag filled with old yarn ends)- This will become more clear in the next article.
If you purchase a kit, or foam from a store for felting, it is usually firm but not really hard.  This helps keep the needles lasting longer.

I have found my own supports that I like, and have never purchased one.

Basically, any piece of foam large enough to use and thick enough is worth trying out.  You may have something lying around the house that can be used. An old  foam or fiber pillow with the cover removed, a piece of foam that was shipped with a computer or other object.

My two favorites are an old thick chair seat I cut into blocks, and a yoga block that I no longer use.

Even when I did yoga,  I never really used the block, so I didn't mind sacrificing it. 

I literally found the big chair cushion on the side of the road.  I am a big believer in law of attraction and in fact, have a website about it called  flowingmiracles.com in case you want to visit me there.

  But anyway, about the foam.  I was driving along and I was thinking about a needle felting class I was going to teach at a local yarn shop later in the week.  I was wondering what I would use for foam for the students in case there were a lot of them.  I noticed this thick seat cushion  on the side of the road that had probably fallen off someones truck or car while moving furniture.  I stopped, brought it home, cut it up, and washed it.  It was pretty filthy.

The blocks are not too pretty where I hacked them with a knife but it works great. It is very thick-about 5 inches.

You don't need to spend money to find foam for felting. Most likely you have something lying around that you can use.  Experiment until you find something you like.